Fear of Yeast …. gone!

I’ve always wondered how to bake bread but I am a coward in terms of handling yeast. I have cooked many kinds of meals from different cultures but when it comes to using yeast, I am always intimidated. Why, you ask? I guess it’s because I never really saw how bread was made when I was young. It’s only now that we have YouTube, eBooks, Pinterest, etc. that I learned and discovered the many ways to prepare food and this trained me to cook better.
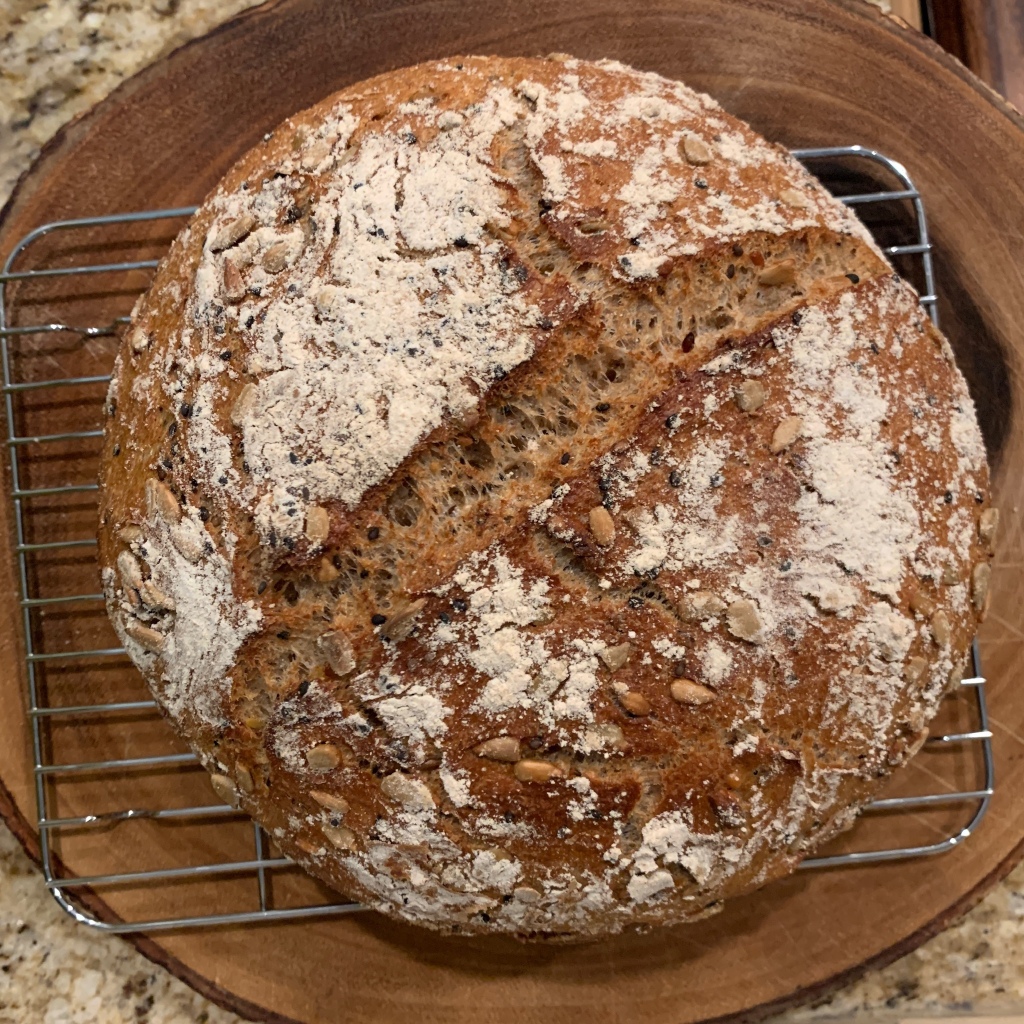
My whole grain Artisan Bread

Many years have gone but it’s only now in 2020 that I realized I wanted to try again and learn to bake bread. The COVID-19 Pandemic was actually the primary reason why I explored new ideas at home while on stay-at-home order and I courageously faced my fear (from yeast…. yes, instant yeast).

Back in March 2020, my first ever try was to make a pizza dough for my family. During the start of the COVID pandemic, I wanted to do fun things with my children and I knew that if they made their own pizzas, they would be super excited. It was a success! I usually research online for recipes and watch YouTube videos on how other people make it. Then I write down my own measurements and ingredient preferences. After which I try to make it myself.

This is the story of how I faced my fear. From that day on, March of 2020, we never had store-bought bread at home. I tried many types of bread recipes and I will share them to you on my next posts.

To all those who haven’t tried baking, try it! Baking our own whole grain bread is actually one of the greatest things that happened to our family. We used to all love to eat white bread. But now, all of us eat whole grain all the time. I still bake special treats for my family of course. That is part of eating healthy, rewarding ourselves with treats. Treats that I made myself knowing that I only use the healthier ingredients.


PIZZA DOUGH RECIPE

Ingredients:

  • 4 cups All-purpose Flour
  • 1 1/2 teaspoon salt (I use pink Himalayan salt)
  • 1 1/2 teaspoon instant yeast
  • 1 1/2 cups of lukewarm water
  • 1 tablespoon olive oil

Procedure:

Using a stand mixer, mix the flour, salt and yeast. On low speed setting using the paddle attachment, start mixing the dry ingredients then add the water. Mix until the dough forms. Transfer the dough to a large bowl drizzled with olive oil. Make sure to coat the dough in oil, knead a little bit and form into a round dough. Cover with plastic wrap and proof for 2-4 hours at room temperature (I always use my proofing oven to be precise).

After rising, you can use the dough immediately and prepare to shape into pizza sizes that you prefer or you can store the dough in the refrigerator for up to 2 days (make sure to rest the dough at room temperature before using).

This recipe is enough to make 4, 8-10 inch pizzas just like what we did. Bake your pizza at 450°F for 7-12 minutes depending on how big/small, thick/thin your pizza will be. Sometimes, I pre-bake the flattened pizza dough for 5 minutes, then add my toppings and bake it for another 5-7 minutes. It really depends on your preference.

I am planning to make some dough tonight and keep it for tomorrow’s Friday night pizza. What’s your plan?

‘Til my next post…. If you enjoyed reading, please like my post and thanks for reading.

My version of Taboulleh (Tabouli)

This salad is one of my family’s favorite salad. It is refreshing, easy to make, very healthy and affordable. I make this salad with Bulgur . You can buy bulgur at most Mediterranean or international supermarket. I use course bulgur on mine because I love the course texture mixed with my other ingredients. If you cannot find bulgur, other alternatives can be quinoa or couscous.

Here’s my recipe, I hope you can make it too:

Continue reading

Chinese Tsa/Cha misua and Misua birthday noodles

Special thanks to Mommy Dylebing 🙂 for being my teacher

Marrying into a Filipino-Chinese family was a life-changer to me.  Since childhood, I enjoyed learning about different cultures in Asia and now that I am older, food culture really catches my interest.  One thing me and my husband promised to one another is that after getting married, we will continue one special Filipino-Chinese tradition he grew up with.  That is, having a yearly traditional chinese birthday noodles called “misua.”

From day one of marriage we have always made this soup to traditionally serve first thing in the morning for our birthday celebrant in the family.

What does having misua soup or cha misua mean to the Chinese?  From what I read and what I learned from my mother-in-law, having this soup symbolizes several things – The long noodles symbolizes longevity.  It is said that for a traditional Chinese birthday, serving long noodles represent many more years to live.  It is a Chinese superstition that breaking or cutting the noodle will bring bad luck so every time we make this soup, the utmost care is observed to make sure the noodles are cooked well without breaking them.

Chicken to Chinese represents happiness, prosperity and if served whole, it means family reunion or togetherness of the family.   Eggs symbolizes fertility or fruitfulness.  And so on and so forth…

Now, I want to teach my viewers how to make this traditional Chinese birthday noodles.  I made two types of birthday noodles.  First is the Misua birthday soup and the next is the Cha/Tsa Misua or the stir-fried noodles which my husband always calls “tuyong misua” (dry misua) in Filipino.

MISUA SOUP INGREDIENTS:

1 whole chicken, boiled for 30-45 minutes (no salt)

Misua noodles

Hard boiled eggs (one per person), peeled and served whole

Minced garlic, browned in oil with a little salt

Chopped Green onions, for garnishing

Shred shards of chicken (himay in Tagalog or pull by hand) then set aside.  Reboil the chicken stock used to boil the chicken making sure to skim off any foam.  Upon boiling, add the shredded chicken meat and misua.  No need to put salt as the misua noodles are already salted.  Cook for 3-5 minutes depending on how you want your noodles done.  Serve in a bowl and top with one whole hard-boiled egg, sautéed brown garlic and chopped green onions.

INGREDIENTS FOR TSA/CHA MISUA

1 whole Chicken Breast, sliced thinly

5-10 pieces of medium-sized Shrimp, deveined and sliced in half

1/2 cup of good quality fish balls or scallops, sliced

Small piece of Pork, tenderloin or any tender part (boiled and sliced thinly)

Chinese long-life birthday noodles

4 large Eggs

1 bunch of sliced green onions, for garnishing

5-10 pieces dried Shiitake mushrooms, rehydrated with warm water for 1-2 hours

1/2 cup shredded Cabbage

1/2 cup sliced Crimini mushrooms

1/2 cup julliened Carrots

1/2 cup threaded and sliced Sugar snap peas

3/4 cup raw Peanuts with skin

1 bunch of fresh Cilantro, washed and roughly chopped for garnishing

Lots of Shallots, for garnishing

Oyster Sauce

Rice cooking wine

Olive oil

Salt and pepper to taste

First thing I do is I always roast the peanuts on a hot frying pan.  It is done when the aroma of freshly roasted nuts, about 3-5 minutes of medium heat is fragrant in the kitchen.  With the same pan, using 2 beaten eggs, make a very thin omelet for garnishing later.  The other two eggs needs to be cooked in boiling water until hard-boiled, about 12 minutes.

In another shallow cooking pan, boil water and cook the long life noodles according to package instructions.  This will always depend on the kind of noodles you have available in your area.  Mine took 2-4 minutes to cook in boiling water.  After boiling, strain the noodles and quickly wash with cold water.  Before setting aside, put a little bit of sesame oil and mix the noodles well to prevent it from sticking.

In a large wok, heat olive oil to medium heat.  Cook the shallots until translucent then season with salt to taste.  Set this aside for garnishing.  I make lots of shallots because this makes the misua taste so good.

In the same wok, heat more olive oil to medium high heat.  Cook the drained shiitake mushroom until brown and fragrant.  Add the garlic, chicken, shrimp, pork and fish balls.  Cook until everything is more than half done.  Season with a little salt and pepper then stir fry with some rice cooking wine.  Next, add the rest of the ingredients – carrots, cabbage, sugar snap peas and crimini mushrooms.  Mix in 1 tbps of oyster sauce then cook and mix everything well.

To serve, put the noodles on a serving platter/bowl.  Top with the meat and vegetable mixture.  Garnish with sliced omelet, sliced hard-boiled eggs, roasted peanuts, chopped cilantro leaves and green onions.  Each person who eats will mix in their own fried shallots according to their preference.

VOILA!!!!  All done!

I love cooking this for my family.   Even our children had their first misua soup on their first birthdays and still does every year as their birthdays are celebrated.  As for me, my family makes it for me when it’s my birthday and that what makes our celebration very special.  It’s not the gifts, the cakes, balloons or ice cream – it’s our birthday misua soup that we enjoy as a family together first thing in the morning on our special days.

Enjoy!!!

Homemade sugar-free Almond Shortbread cookies


I am an amateur when it comes to baking but I always want to try new things.  Today, my eldest daughter home and is still on spring break.  I thought it would be fun to make cookies with her so we can spend time together in my kitchen while creating fun time memories teaching her how to bake this very easy sugar-free recipe I learned from looking up different recipes online.  Here’s how I made my own version:

INGREDIENTS:

  • 2 cups sifted All-purpose flour
  • 1/4 cup Splenda (for baking)
  • 1/2 tsp. Salt
  • 2 sticks of unsalted Butter, room temperature
  • 1 cup raw whole Almonds
  • 1 tsp. Vanilla extract

First, sift the flour and salt into a bowl.  Then, using a coffee grinder (I use mine to grind rice for porridge for my baby) on percolator settings, grind the toasted almonds.  In a big mixing bowl, start creaming the butter, sugar substitute and vanilla until creamy and fluffy.

Slowly add the sifted dry ingredients into the creamed butter mixture.  Towards the end, add the ground almonds.  The dough will be  ready after everything is mixed well.  Wrap the dough in a plastic wrap and chill in the freezer for 10 minutes.

Preheat the oven to 350 degrees fahrenheit.

When dough is firm, roll it out about 1/4 inches thick onto a floured surface.  You may create any shape that you like using a cookie cutter.  Half of my dough, I made round drops of cookies then we put some sugar-free jam into the center of the cookie.  My daughter made her own cookie shapes (hearts, stars and weird shapes I can’t even explain).

Before baking, place the shaped cookie dough in the freezer for another 5 minutes to make sure it retains its shape while baking.

Bake in oven for 15-20 minutes or until light brown.  Mine took about 18-20 minutes because I used a Silpat mat on my cookie sheet.  You may use parchment paper to line your cookie sheet as well.

Cool in wire rack.

TOASTING RAW ALMONDS:  Place the raw nuts on a baking sheet and bake for 5 minutes under 350 degrees fahrenheit.

It’s crumbly and creamy and not too sweet.  We love it!

Farmer’s Market Day – Historic Park @ the Irvine Ranch

We are very lucky to have a number of local farmer’s market around where we live.  Going to a farmer’s market makes me remember memories of going to the wet/dry markets of Manila with my parents when I was young.  The picture below was taken during our last vacation in 2009 at a wet market in Pasay City, Manila.

This place is called “Dampa Seafood Market.”  It is located alongside rows of restaurants that cooks the freshest seafoods (according to how one wants it cooked) purchased at stalls like the one in the photo below.  This is another story I will explore on our next visit to Manila (this year) and will definitely share to all my readers 🙂


It was a beautiful morning today so I decided to bring my daughters to the Farmer’s Market located behind the Katie Wheeler Library in Irvine.  This particular farmer’s market is open on Tuesdays only from 9AM to 1PM.  I’ve been going to this place for many years now.  It’s only a small group of local sellers but every time I go there, I get to buy everything that I need.

The best inspiration to a good meal are fresh organic ingredients readily available and affordable.

Fond memories are created each time I bring my children to this place.  When they grow up, they will always remember the happy times we shared going to farmer’s markets and the library 🙂

Related Articles:

Orange County Farmer’s Markets Information

Katie Wheeler Library – Great library for the family!  I’ve been bringing my children here since it opened in 2008.  This library shows a great history of the Irvine family.  I specially love the Children’s department at the library where I can relax and read books with my daughters.

Basa Fish Fillet cooked in Lemon sauce

Something smells fishy and savory…

I love fish.  Don’t you?

Instead of eating red meat or poultry, I’d rather eat seafood.  I enjoy the light flavor and the variety of dishes I can make out of the many kind of seafood in the market.

I grew up eating fish because my Dad loves to eat fish.  Growing up, I remember going to the “Palengke” or wet market.  Fresh caught fish, shellfish, octopus, crustaceans and even sea cucumbers and sea urchins can be bought.  It’s simply a delight learning easy fish recipes but what makes me extra happy about this particular recipe is that my family gave me a high score on this 🙂

Ingredients:

  • 3 pcs. Basa fish fillet
  • 3 tbsp. Capers, washed and drained
  • 1 Lemon
  • Ginger, julienned
  • Shallots. thinly sliced
  • Olive oil
  • Salt and pepper

Cut the Basa fish fillet into bite sizes.  Cut the lemon in half.  Juice half of the lemon while slicing the other half into very thin round slices.

Into a non-stick pan, heat 1 teaspoon of olive oil.  Saute the ginger and shallots until fragrant.  Add the fish, some salt and pepper, the capers and the sliced lemon.  Cook for 2-3 minutes on medium high heat.  Add in the lemon juice and drizzle with some more olive oil.  Cover the pan and cook for another minute.

Very easy!!!!

Make a Bento Box

I am crazy for Bento and my dream is to become a  Bento Chef 🙂  Is there such a person? 

To prepare a bento box,  first of all, even before you start being creative, you need to have the money to buy all these tiny things to make your bento look really cute.  I love purchasing small bento accessories.  I buy only the best ones I like and keep them for future use.  These accessories are quite pricey considering that most of them are disposable so if you are practical, try to reuse these super cute bento accessories.  I am into knick knacks when it comes to cooking and I adore the colorful creations seen at Japanese Bento books.  When I see the photos of wonderfully made bento boxes, I always wish I could make that too.

Here, I created a simple bento box for lunch.  What’s included?

  1. Pan Fried Alaskan Salmon fillet
  2. Brown rice with pre-cut sea weed topping
  3. Seasoned blanched Broccoli
  4. Seasoned Spinach
  5. Fresh-cut Nectarines

Here’s how I made it:

For the Salmon, I just seasoned the salmon with salt and pepper then pan-fried with Olive Oil, about 5-8 minutes per side on Medium high until the skin is crispy.

For the Broccoli, boil water into a tiny pot or saucepan and season with salt.  Blanch the broccoli for a minute then drain and quickly rinse under cold water.  Using the same saucepan, brown some garlic on olive oil then add the blanched broccoli.  Season with a mixture of light soy sauce, a dash of sugar and some cooking sake.

For the Spinach, boil water into a tiny pot and season with salt.  Blanch 1 bunch of spinach then wash in cold water, drain and squeeze off the excess liquid.  Randomly chop to create bite sizes of the spinach.   Season with minced fresh garlic, light soy sauce, dash of sugar, tiny drop of sesame oil and a few pinches of sesame seed.

For the Brown Rice, cook it accordingly.  You can use left-over rice that you have in your fridge.   I just used my sushi mold to shape the rice like so (see photo) then topped it with a pre-cut seasoned laver (sea weed). 

For the Nectarine, cut into bite sizes and add into the bento.

I try my best to keep my seasoning at its minimum to make sure my cooking will taste as natural as it is. 

If you have some quick bento recipes to share, please do share to me 🙂

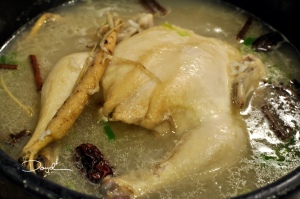
Samgyetang (Korean/Chinese) Ginseng Chicken Soup

Samgyetang (Ginseng Chicken Soup)_4604902853_l

I’m sure most of you will like this recipe because it’s one of the easiest, nutritious and delicious soup of all time.

I consider this as one of our family’s comfort-soup aside from our classic Sinigang and Tinola.

This soup is made with Ginseng or other Traditional Vegetable Root Tea available in your Asian Market. It is believed by a lot of Asians to help cure and prevent ailments.

If and only “IF” your closest Asian Market do not have fresh or dehydrated ginseng, you can also use a couple of pure ginseng tea bags as a replacement.

Here’s how to make Korean/Chinese Ginseng Chicken Soup:

INGREDIENTS:

1 Whole medium size Chicken (or large cornish hen)

2 Stalks of Green Onion

1/4 cup of Garlic Cloves

1/3 cup of Glutinous Rice

7-10 pieces of Red Dates (Jujube)

Ginger

Ginseng (Fresh or Dehydrated)

5 pieces of Chestnuts

Cold Water

Salt and Pepper (optional)

Prepare all ingredients. Soak Glutinous Rice for 5 hours or overnight.

Wash your chicken and remove any excess fatty skin. Stuff the cavity of the chicken with the soaked glutinous rice, some garlic, half of the dates and chestnuts and some ginseng. Don’t forget to crush the ginger and add it as well.

Close the opening of the chicken with toothpicks. If you don’t have toothpicks, you can keep it open but place the chicken in a big pot carefully. Put in the extra garlic, ginseng, dates and chestnuts with the whole chicken then pour water enough to cover all the ingredients.

Start to boil for 20 minutes with a foil on top of the pot to cover. When boiling, make sure to remove all the scum to keep the soup clean and clear. Add more water if necessary. When it boils back, cover again with foil then simmer the soup for another 40 minutes to an hour on medium to medium high heat (depending on the kind of pot you’re using).

Before serving, you may add some freshly ground pepper and sea salt and some minced green onion.

Enjoy each slurp of this nutritious soup and each bite of the ginseng, dates, chestnuts, and tender young chicken. I love to eat the garlic on this soup because it melts in your mouth 🙂

If you have questions, feel free to comment and I will be glad to help answer your question/s so you can make your own version of this recipe.

Thanks for reading!!!

Japchae Recipe (jabchae, chapch’ae, 잡채, 雜菜)


Vodpod videos no longer available.

more about “Japchae Recipe“, posted with vodpod


I first tasted this as a side-dish at a local Korean restaurant here in Irvine. Then back in 2008 after downloading the podcasts at Maangchi’s website, I tried her version of Japchae and loved it!

My family loves noodles and we cannot live without it.  After eating all rice as our staple, we often crave for noodles for a change.

This recipe I am sharing is a recipe I got from the backside of a pack of my favorite Korean Vermicelli and I’d like to share it to you with a few of my personalized touch.

INGREDIENTS:

300 g. of Korean Vermicelli

1 medium Carrot

150 g. of Beef or Pork (you may adjust the amount)

1 medium Onion

5-8 pieces of Dried Shiitake Mushrooms

1 Egg (I use egg substitute)

1 bunch of Spinach (to me, the more the merrier!)

Olive Oil

Slice meat into bite sizes or strips and mix well with the meat seasoning (see below). Slice the re-hydrated mushrooms and season with soy sauce and sugar.  Wash and blanch spinach in boiling water, drain and squeeze the excess water.  Season with sesame oil and salt.

Slice the onion and the carrot into strips, stir fry with a pinch of salt.  Since I use an egg-substitute, just spread the mixture into a frying pan with oil on medium heat to make a thin flat egg crepe.  When done, fold and slice into thin long strips.  Stir fry the seasoned meat and mushroom separately on the frying pan.  Cook the dry vermicelli in boiling water for 6 minutes (or depending on the package instructions of the brand you are cooking).  Rinse in cold water and drain.  Boil 3 tbsp. of soy sauce, 1/4 cup water, 4 tbsp. of sugar (splenda), 1/2 tbsp. of sesame oil, 1/4 tsp. black pepper, 1/2 tsp. grounded roasted sesame seed on the deep frying pan and add the cooked vermicelli and stir well under low heat until it is shiny.

Mix all ingredients prepared separately.  Garnish with the strips of egg and some chopped green onions.

*** Meat Seasoning – 1 Tbsp. Soy Sauce, 1 Tsp. Sugar, 1 Tsp. minced Garlic, 1 Tsp. Sesame Oil, Black Pepper and Salt